Wednesday 28 November 2012

Chocolate quick fix


I work funny hours and I don’t always have a time for things I like doing but there is always some way how to get where you want to. I don’t work much with chocolate but it is easy and even if it is not quite right it can always be melted and redone. I bought small cake and did some chocolate decoration - problem solved. 

Melt chocolate above steam and allow cooling enough to be piped. Also use forms, molds and grease proof paper.  Place small colored sweets in molds or 3d pipe. I also tried to put peanut butter in chocolate. Put in fridge and it's all done!


Jim Beam


This one is only small cake but made for a fun. It contains alcohol – not surprisingly. Sponge was fairly simple, baked in bread tin on gas mark 4.


Sponge
200g of sugar
200g of self-rising flour
200g of butter
1 table spoon of baking soda
3 table spoon of water
                             1 tea spoon of vanilla essence
Buttercream
75g of butter
175g of icing sugar
1 or 2 table spoon of Jim Beam – do taste the buttercream so it is just right

Baked sponge is filled by buttercream then cut sponge into bottle shape. Cover cake with yellow icing and white icing for lid. Make a plate for bottle label – I simply printed it out on plain paper. Place cake in a box and all is done.


Blueberry cheesecake - uncooked


Biscuit
200g of plain digestive biscuits
200g of shortbread biscuits
3 table spoons of butter
2 table spoons of caster sugar
Melt the butter. Brake biscuit into small crumbs and mix with sugar. Pour butter in biscuit crumbs and mix until smooth but not too runny. If not smooth enough add more melted butter if too runny break in more biscuits. Allow chilling in fridge.

Cheese cream
200g of cheese spread
200g mascarpone cheese
Juice of 1 lemon
100g of blueberries
Caster sugar 3 spoons or more if you prefer sweeter cream.

Pour cheese/cream over the biscuit base and use the rest of blueberries to decorate the top of the cheesecake. Place in the fridge for cream to stiffen.   

Wednesday 21 November 2012

Biscuits - lemon and coco


I was looking for good recipe for biscuits for a while. These are easy to do and won’t take long.


Ingredients

·         325g plain flour

·         200g chilled salted butter

·         125g/4½oz golden caster sugar

·         2 tea spoon of  good-quality vanilla extract

·         2 large free range egg yolks

·         Lemon zest

·         Coco powder 1 table spoon

All ingredients are mixed in large bowl. Then half the mix and lemon zest into one and coco powder to the other. Once the mixtures are even color place those into food bags and alow chilling for at least two hours.


Rolling and cutting will be easier if additional flour used . The thickness of rolled out mixture should be 5 to 8 mm. Use cutters and place biscuits on greaseproof paper. They won’t grow but they shouldn’t touch as they go to oven.
If doing animals like I did use coco mix on lemon one and create spots etc.

Oven should be preheated for at least 20 min at gas mark 4. Smaller biscuits will not take long to cook so watch out with your first batch. I left mine in oven for 12/15 min.


British / Jubilee cake!


This one was done in British spirit to share with my friends after fantastic BBQ. It is simple but tasty.


Firstly I baked three sponges - plain, blue and red. To keep it simple cake was glued together with buttercream and jam. Whole cake is later covered with buttercream and white icing.
 

3 x Bake sponges

200g of sugar

200g of self-rising flour

200g of butter

1 table spoon of baking soda

3 table spoon of water

1 tea spoon of vanilla essence

Food coloring (red and blue)

Also

                                Jam – raspberry

                                Ready to roll icing – white

                                Hard boiled sweets – to be melted and shaped in silicone molds 10ps


Buttercream (2x75g of butter + 2x175g of icing sugar +4 table spoon of milk and 1 tea spoons of vanilla essence + lemon zest)


Melt hard boiled sweets in silicone forms – stars and hearts - with some food coloring. Allow cooling. Color up some icing in red and blue. Roll it out and cut out the triangle shapes.

Cooled hearts and stars place on the cake.  Cover the board with British flag icing next – slowly cover spaces with white and red stripes then blue fields in between.  Follow up with white and red icing banner around the bottom edge of the cake. At last - take blue and red triangle shapes – flags -  and place them on the top of the cake.

And there ii is! Modest British cake!


Tuesday 13 November 2012

Mini Barbie cake


This was little cheering cake for a friend. I baked two rectangles shaped sponges and cut circle shapes out of it. Sponges were moist with mandarin juice, glued with buttercream and mandarin segments.

Sponge 2x           200g of sugar

200g of self-rising flour

200g of butter

1 table spoon of baking soda

3 table spoon of water (I used mandarin compote juice)

Also

                                Ready to roll icing – white

                                Food coloring – pink and green

                                Mandarin compote

                                Yellow ribbon

                                And Barbie


Buttercream (75g of butter + 175g of icing sugar +2 table spoon of milk and  tea spoon of vanilla essence + mandarin zest)


The skirt was firstly covered by pink icing to create an illusion of underskirt, then white panel – front part. Take fork and press it so it looks like folds of skirt. Then soft-green covers it all. Do not press down leave the natural shape.

Use white piping to cover up the edges of skirts. Pipe dots on the front of the cake. Pink pearly sweets go around the back skirt.

Barbie got covered in cling film everywhere the icing go. Place Barbie in the cake. Piece of pink icing will cover Barbie’s bottom – skirt and white icing covered by pink sugar will be top of the dress. Pipe white icing as lace around the neck. Put pink ribbon at the back of the skirt. Yellow ribbon is a belt.

Place pink pearly sweets where pink skirt meets green one. I place additional white icing and pink sugar circles on the back of the skirt but it is optional.


Pumpkin


Halloween is one of my favorite times to bake. The Pumpkin was made last year – and was fairly successful! The cake was actually very easy to bake and construct. Use two round sponges moist with fruit juice and filled with jam. The top of cake has pieces of third sponge glued with jam with gaps between the pieces to create allusion of pumpkin top. Cake was covered with buttercream and then with yellow icing.

Sponge              200g of sugar

200g of self-rising flour

200g of butter

1 table spoon of baking soda

3 table spoon of water

1 tea spoon of vanilla essence (Bake on gas mark 4 up to 40 min depends on your   oven.)

Also

                                Jam – raspberry

                                Ready to roll icing – white

                                Food coloring – yellow, green, black


Buttercream (2x75g of butter + 2x175g of icing sugar +4 table spoon of milk and 1 tea spoonsof vanilla essence + orange zest)


Lines were drawn to imitate natural shape of vegetable. Black icing was used for eyes, nose and smile. Also for a spider. Green icing was mixed up with black and white icing until marble effect was achieved. I used cutters for leaves. Left over yellow icing was used for sweets together with some white icing.

There was some piping done in white – writing and several web made and green piping for leaves and vines.

Whole cake was finished by black ribbon.


Friday 9 November 2012

The Bony - Halloween


I made this cake at work – I work with people – this was 1-2-1 activity with a Gentleman who is no longer with us… However we had a fun making it so I think this is the way how to remember …

So the cake was made of 2 sponges - the work stock was pretty limited so we used:

2x                       200g of sugar

200g of self-rising flour

200g of butter

1 table spoon of baking soda

3 table spoon of water

1 tea spoon of vanilla essence

Bake at gas mark 4 for up to 40 minutes depends on your owen.


Jam

Icing sugar and butter for buttercream

                           Icing


Bake two sponges and glue them together with jam and buttercream. 3D shape it into face – use the cut offs and create the jaw and eye brows. Cover the cake with the buttercream and allow chilling, Color icing grey and cover the cake.  Place black colored icing into the eye cavities.Make two eyes from remaining icing and make set of teeth as well. Finish eyes with red and yellow irises and pipe pink capillaries. Also decorate the tooth with a diamond and pipe up some webs. There is also a black ribbon round the cake.
 

Strawberry shortcake


My friend asked a little favor I couldn’t say no to. A “Strawberry shortcake” cake for six years old. Aaaah!

This was my first two tear layer cake so I thought I’ll share this experience.


My friend chose her design and flavors so it was up to me to put it all together.


I used 3 sponges for bottom tear and 2 sponges for top tear – the diameter of top tear was smaller so once the butter risen – it was taller.


5 x Bake sponges

200g of sugar

200g of self-rising flour

200g of butter

1 table spoon of baking soda

3 table spoon of water (I used strawberry compote juice)

1 tea spoon of vanilla essence

Food coloring (optional)

Also

                                Jam – strawberry

                                Ready to roll icing – white

                                Ready to roll icing – red and green

                                Wooden or plastic support for cake

                                Cocktail sticks

Buttercream (3x75g of butter + 3x175g of icing sugar +6 table spoon of milk and 2 tea spoons of vanilla essence + lemon zest)


Each sponge is moist by strawberry   fruit juice, jam and strawberries. Glue sponges with buttercream. Make two individual cakes and cover those with buttercream.  Allow chilling whilst preparing the icing.


Cover both cakes with white icing.


Top tear:

Glue pink, red and green icing to create circles and green banner to go round the cake with buttercream.  White icing - to create long string to go around the cake – again use buttercream. For strawberries - color some icing and shape it in strawberry shape, then take green icing and create strawberries leaves.  Cocktail sticks will allow attachment to the cake. Use honey to cover strawberries and create an illusion of freshness.  The small flat brush dipped in black coloring will  create seeds effect. Allow drying, and then attach to the cake. White five petal flowers are handmade and pink buttercream is colored buttercream used in cake.
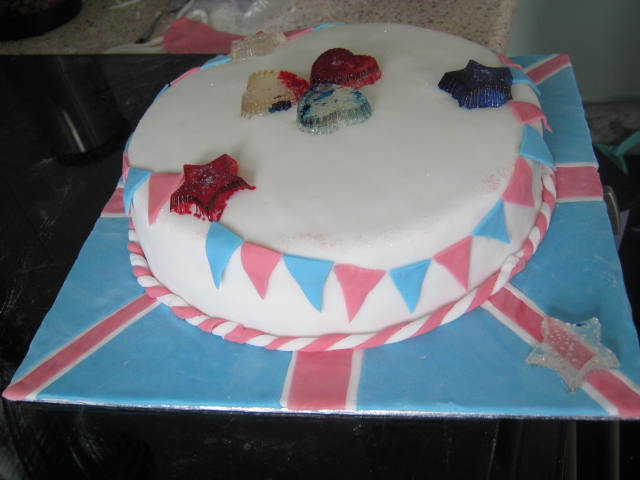


Bottom tear:

Use pink icing to cover top of the cake. Attach green and red stripes with buttercream. Place some red spots and white flowers as required. Long white icing string will cover the edge of pink icing.


Don’t worry if your buttercream is showing, once it is cooled down it can be carefully wiped away of scraped away with knife.  Also make some small flowers from white icing - using cutters - this will hide the bottom edge of top tear. Transfer cakes separately if needed and put together once safe at the destination. Ensure the wooden or plastic support is used so top cake’s weight is carried by support and not the bottom cake alone.


White flowers are glued on with buttercream at last.


Tutitu


Tutitu is a character from TV series. This kind of vehicle – I was told – comes about and using it’s back side to spell things and so on… It was requested by my sister to create girlie version for her baby daughter.

So we decided to alter some colors and as I baked at my sister’s place this truly prove the point that everyone can at least to attempt to bake at home.

This was only a small cake so we baked only two chocolate sponges, poured  4 spoons of fruit juice on each  filled them with jam and forest fruit.

2x                       200g of sugar

200g of self-rising flour (remove 1 spoon full of flour and replace it with coco powder)

200g of butter

1 table spoon of baking soda

3 table spoon of water

1 tea spoon of vanilla essence

Food coloring (yellow, pink, blue, green, white)


Plus                    Jam

Forest fruit compote

Ready to roll icing


For the 3D modeling it is easier when you place the cake in fridge for several hours (2). Then cut out shape as on the picture – engine, back side, wheels – kind. Cover the cake with butter cream and allow chilling.

 
Color the icing or sugar paste, roll it out and cover the cake. Color remaining icing yellow, blue and green and complete other little parts like eyes, smile, teeth, spots, and engine.

For the Tutitu’s cockpit I used the top of water bottle shaped like bubble.

Complete the cake by covering the serving board by blue icing creating the illusion of clouds.